Showing posts with label green. Show all posts

Thursday, January 28, 2010

A Little Taste of Summer

Right about now is the time of year when winter fatigue starts to settle in for me. I’m tired of gray days, tired of short days, tired of wet and muddy, and I’m really, really tired of cold.

My mother was a gardener of both vegetables and flowers. This is the time of year that she would sit down with her seed and bulb catalogs and plan her gardens.

I, unfortunately, did not inherit her green thumb. House plants enter my abode kicking and screaming, knowing that their lifespan has been shortened considerably just by crossing the threshold. The few times I’ve attempted tomato plants have yielded no more than one or two runty, mealy tomatoes not worth eating.

Basically, I gave up long ago.

Then at the end of last summer, I stumbled upon the book All New Square Foot Gardening by Mel Bartholomew.

sqft

You build a raised bed 4ftx4ft, divide it into sixteen squares, and plant a veggie (or whatever) in each square. No more tilling up your whole yard and endless rows of weeding, etc. (There’s more to it than that, but I’ll let you read the book.)

Fortunately, Craig is enthusiastic about giving this a try, so as usual he will be the brawn behind the project. If all goes well, I’m hoping to have some of these this summer:

Fullscreen capture 1272010 105403 PM.bmp source

Fullscreen capture 1272010 105740 PM.bmp source

Fullscreen capture 1272010 110039 PM.bmp source

Fullscreen capture 1272010 110517 PM.bmp source

Fullscreen capture 1272010 110847 PM.bmp source

Well, I’m optimistic, at least! And I enjoyed that little glimpse of summer; hope you did too.

Seriously, if you are considering planting a garden this year, especially if this will be your first and you don’t already have a big garden laying fallow in your backyard, check out this book. It really looks like a brilliant why-didn’t-anybody-think-of-this-before method and gets great reviews on Amazon.

Friday, November 20, 2009

Thrifty Gifty #1—Repurpose Clothing as Pillows

Joining Frugal Friday at the Shabby Nest and Holiday Linky Friday at The Inspired Room. and Sat. Night Special at Funky Junk Interiors.
I’m going to be doing a series through Christmas on really inexpensive gifts you can make with thrift store finds. Also, linky parties for you to show your thrifty gifts Dec. 4, 11, and 18. Grab my button (code on sidebar) and spread the word!

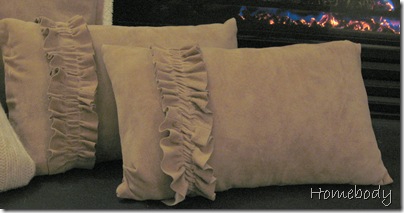
It all started with this faux suede pillow. I got it at Goodwill several weeks ago for $2 for my son’s room. But then I decided I liked it on my white couch for fall/winter, and I needed more.

IMG_4558

A few days later, I found a pair of genuine suede pants at my consignment store outlet for $1. I already had a couple of pillows that had seen better days.IMG_4519 I cut off the legs at the knees. These particular pillows fit perfectly inside the legs. I created ruffles from a strip cut from the very bottom of each pant leg and sewed it to what would become the front of each pillow. Sewed up one end of the pant leg tube, stuffed the pillow in, and used Fabri-tac to close up the other end.IMG_4563
What remained of the pants, the waist to the knees, I cut apart at the seams, removing waistband and zipper. I wanted another pillow similar to the original, with the sherpa edging. I got this adorable fuzzy baby suit at Goodwill for $1.

IMG_4546

I kinda hated to do it, but I cut it into strips.IMG_4550 I sewed the strips together end to end so I had one super long strip. I folded that in half length-wise, right sides out, and sewed down one side. Now I had one long tube.IMG_4552

I had cut the suede into squares to fit my pillow form (another old pillow I wasn’t using). With the suede right sides together, I sandwiched the sherpa tube between them and sewed around 3 sides of the square, being sure just to catch the edges.IMG_4555Then I turned that right side out, put the pillow form in, and glued the other edge shut. That was a little tricky with the three layers; normally I would hand-sew a pillow closed, but it was too hard with the suede.

Also at Goodwill, I got this cable-knit lambswool sweater in the kids’ section, $1. Again, I had the pillow.IMG_4543

Another perfect fit. I cut the sweater straight across under the armpits, and sewed across that end (wrong side out). Turned it right side out, stuffed the pillow in, and hand sewed the open edge. I'll save the top of the sweater and the toggles for something else.


IMG_4545

Four luxurious pillows for $3! An acrylic cable knit pillow at Target is $17.99. Faux suede pillows at Cabela’s (the closest thing I could find) are $24.99.

IMG_4562

So, let’s break this down. I had all the other supplies I needed, such as thread and pillow forms, so all I had to buy were the 3 articles of clothing. If you don’t have any old pillows at home that you can use, you have a couple of options.

1) Buy throw pillows at the thrift store to recover. There are ones that aren’t gross! This could cost between $1-$3. If you can find down-filled, that’s even better!

2) Use fiberfill (I use Poly-fil). A big bag costs about$3-4, and should be enough to do several pillows.

You may not be lucky enough to find suede pants for $1, but how about corduroy, linen, or tweed? Find a texture or pattern you like, and use your own creative embellishments, such as buttons.

Sweaters, of course, are abundant. Tip: often, childrens’ clothing costs less than adult. Also look at the household linens section for possible fabrics. How many pillows could be made from a knit throw or a chenille bedspread?

Including the one I didn’t make, this whole couch-full of throw pillows cost me $5!IMG_4566

Friday, October 16, 2009

Total Overhaul

Today I became quite…intimate… with my seam ripper. It was a rocky relationship; tempers flared. But in the end, we were able to pull it off.

I totally started over on my felted wool bag.

I liked it, but I knew I wouldn’t use it because the straps were way too bulky. I wasn’t quite sure where I was going, but I knew the straps had to come off. I cut pieces off, I ripped out seams, I sewed new ones.

And ripped the new ones out again, and sewed them up again. My sewing machine is having tension issues. If you sew, you know that bad tension can really mess things up. And in turn, give you tension issues, like screaming and slamming things down in disgust.

But I digress. I turned the two straps into one long one. I made a lining out of scraps of drop cloth. When I was, at last, finished, I decided that I needed some closure.

No, not the kind you get by burning your ex-boyfriend’s love letters, although there were moments when I definitely considered doing the equivalent to my sewing machine. Whatever that would be.

What I needed was a button. At the antique mall last Saturday, I bought two bags of vintage buttons. I found one that worked, sewed it on, and made a little strap to button up the bag.

And here’s the finished product:

IMG_4231

I think the butterscotch-colored button adds a little pizzazz. And look, I even have a pocket for my cell phone!

IMG_4234

Okay, so the inside’s not too pretty. I still have a little clean-up to do on dangling threads. But it’s functional, and I really like the outside, and I will definitely use this second reincarnation of the wool sweater, which was the whole point in the first place.

Oh, and here’s a tip for you from Dixie. Shaving your felted wool will greatly reduce the fuzzies.IMG_4217

Wednesday, October 14, 2009

Recycled Wool Sweater Becomes Tote Bag

Last year my friend Dixie (happy birthday, Dixie!) introduced me to Betz White and the concept of felting wool sweaters for repurposing. I even picked up some sweaters at the thrift store for that purpose.

Then I recently saw Wendy’s sweater tote, subsequently found one at Canadian Living, and decided a tote would be my first felting project.

I found a men’s large 100% wool sweater on the dollar rack the thrift store. I liked the tone-on-tone stripe.IMG_4144

After two trips through the washing machine on hot with high agitation, and machine drying, it shrank down to this (use the couch cushions for size comparison).IMG_4186

I cut it apart:IMG_4187

The above linked instructions just used the shoulders as the handles, but I wanted longer straps to be able to carry it over my shoulder. So, I cut two basically equal pieces from the sleeves.IMG_4196

I pinned and sewed across the bottom (wrong side out). The instructions show turning it so that the sweater side seams are down the front and back; I didn’t do that since I was changing it up a little. I did sew a gusset, as shown on the Canadian Living diagrams.IMG_4197

After turning it right side out, I pinned the pieces of sleeves to the shoulder sections (which I had cut apart at the seam) and sewed straight across. There were two of these, forming two straps. IMG_4205

Felted wool will not ravel, but for a finished look, I turned all the raw edges under and sewed around.

Here’s the finished bag!IMG_4214

This was fun (other than the sewing machine giving me fits; I think it may be on its way out), and the end result looks pretty good, but I learned a few things.

1.The two wool straps are too thick and bulky to comfortably carry on my shoulder. Next time, I’m going to modify it to a single-strapped bag.

2. A lining would make the bag more functional, and neater looking on the inside.

3. Hand-sewing certain sections would make for less frustration while topstitching on the machine, and a nicer looking finished product.

I plan to try this again and will show you any improvements I’ve made.

Edit: Go here to see how I remade this bag.

Tuesday, August 18, 2009

WFMW—Washable Swiffer WetJet Cloths

A few months ago I did a WFMW post on do-it-yourself refills for the Swiffer WetJet solution.  At that time I mentioned that I’d like to figure out a reusable cleaning pad for it too.

Well, last week at Dollar Tree I had an aha moment when I saw these microfiber cleaning cloths.

IMG_3761

I purchased two.  One of them I cut into thirds.

IMG_3764

Then I set the WetJet on top of one piece.  The velcro-type fastener on the bottom of the mop grabbed on to the microfiber.

IMG_3765 

It worked quite well.  There was one minor issue:  because the cloth is thinner than the disposable pads and had no cushioning it sort of “scraped” across the floor.  I don’t think it would cause any damage, but I tried a different technique with the second cloth.

IMG_3767 I did not cut it into thirds; instead, I folded it into thirds and put the mop on top, making sure cover the edge of the cloth with the mop head, so the cloth wouldn’t flop around as I pushed the mop back and forth.  That was more cushiony, I and liked it better.

It did not occur to me until just now that it would be very easy to sew around the edges of the folded cloth so I wouldn’t have to worry about flopping.  I think I’ll stack up the three pieces of the other one and sew them together too. 

I’ll be getting more of these cloths and making several pads for my WetJet.  A quick look online shows that to buy the disposable pads works out to approximately 50 cents each.  At a dollar each, these reusable ones will pay for themselves quickly and can be used over and over.  Works for Me!

Visit We Are THAT Family for more great tips.

Wednesday, May 27, 2009

WFMW—DIY Swiffer WetJet Refill

WFMW blog I’ve had my Swiffer Wet Jet for a long time (hence, the photo of the old model). It has not replaced my steam mop, but it’s great for spills or a quick once-over. They want you to believe that the solution bottle is not refillable and that you must buy a new one every time you run out.swiffer2 But we are not that gullible, are we? No, we are not. Just take a vise grip to the white cap and wrench it off (or have your hubby do it, which is how it works around here). Then fill it up with your choice of solution. I use Armstrong floor cleaner, which is what I used to use for mopping before I got my steam mop. I believe the ratio is about 1/8 cup of the cleaner and then fill the bottle up with water. Next time I run out of Armstrong, I’m going to try Dr Bronner’s Sal Suds.

Once the bottle is refilled, just screw the cap back on tightly and use as before. One precaution: I noticed that for some reason if you store the Wet Jet with the reused solution bottle in it, it tends to evaporate. I solved this problem by just taking the bottle out when I’m done Swiffering, and storing it upright.

Have you noticed that so many times thrifty is green(er)? Works For Me! Next, perhaps I'll try to figure out a reusable cleaning pad.

Visit We Are THAT Family for more tips.


Wednesday, May 13, 2009

WFMW-Green Drink Boxes

We have used Rubbermaid litterless juice boxes in the kids’ lunches for years. They are handy, don’t leak, and cheaper than repeatedly buying Capri Sun or the like. Also, I can fill them with my choice of beverage for the kids, which for the most part is water.

juicebox They come with a rigid plastic straw. The problem is, it inevitably gets lost somehow or another. You can order replacements from Rubbermaid, but I never did. I either purchased a new box, or just sent it without the straw, which worked as long as they tipped it up like a sippy cup. Not the greatest for “big” kids.

I recently discovered that I can replace the straw with a regular plastic drinking straw. We always have them in the house. Some are too wide and won’t work, but these, which I get at Walmart, have a good snug fit.IMG_2714

The lid of the juice box has a thing (didn’t know what to call it) where the original straw attached.IMG_2718

Just slide the disposable straw on, and trim the bottom of the straw at an angle to fit into the box. (You will actually trim off the bendy end, so technically you're trimming the top of the straw. But let's not get picky.)IMG_2711 IMG_2713

But wait, this is the best part. Look what else I discovered.IMG_2715 Disposable straws will survive in the dishwasher! I just slip the whole contraption over one of the prongs on the top shelf. I’ve done it numerous times with the same straw. Which means they are only eventually disposable* (again, a technicality). Which also means I can do the same thing with full-length straws that have been used in the regular way. I’m reusing, and reducing my consumption of an admittedly less-than-green a product.

* "eventually disposable" made me think of Miracle Max in The Princess Bride saying that Westley was only " mostly dead".

It’s frugal, it’s environmentally friendlier, and it Works for Me! Visit We Are THAT Family for more great ideas!

Wednesday, April 22, 2009

WFMW—Castile Soap


This morning when I went to clean my very filthy bathroom, I was out of spray bathroom cleaner. I could have gone to another bathroom and got some there, but seeing a couple of bottles of Dr. Bronner’s Castile Soap under the sink, decided to give it a whirl. I did have an empty spray bottle, and squirted in some of the soap (maybe a couple tablespoons) and added water.

IMG_2658

It worked fabulously on all the water spots and toothpaste drips. It wiped cleanly and left no residue. I used the lavender scent, so it smelled great too. In fact, every time I went into my bathroom today I could smell the subtle, clean scent.

I originally got these because I wanted to start using more natural products in general. I was using them to wash my face, and they left my skin clean without feeling dry. The peppermint scent also left a refreshing tingle. I did eventually decide that I needed to go back to my acne wash, though, to help prevent the occasional blemish. (Hello? I’m in my thirties. Shouldn’t I be done with that by now?) I set them aside and kind of forgot about them, until today.

So, what’s so great about castile soap? Dr. Bronner’s is all-natural, organic, Fair Trade, biodegradable, and contains no sodium lauryl sulfate. It’s also multi-purpose, from household cleaning, to personal hygiene, to laundry. In addition, they are very economical because they are concentrated and a little goes a long way.

I also have Dr. Bronner’s Sal Suds, and have been using that in the kitchen for wiping down counters and washing fruit and veggies, but there are dozens of other ways I could be using both products.salsuds

I’m going to get serious about this and really start expanding my use of these products. If you are interested, the Dr. Bronner website has tons of info. I got mine at a discounted price at Vitacost, where you can also read reviews, which often have helpful tips.

Visit We Are THAT Family for more Works for Me Wednesday ideas.

Wednesday, February 18, 2009

WFMW--Taming the Paper Trail


If you have children in school, you will know what I'm talking about. The paper trail is enormous! Every week, my three bring home dozens of worksheets, announcements, notes, etc. This is the pile from one child for one week! Untamed, it can overrun the place.

Rather than just throw it all in the recycling bin, or heaven forbid, the trash, I use the following method. First, I go through it and pull out anything I need or want to save (I still need a system for coping with that stuff!). I also pull out anything that is printed on both sides and put that in recycling.

The stuff with blank, or minimally scribbled on, backs, I use for one of two things. One, I stack it up and load it blank side up into the printer to cut down on our paper use. Most of what we as a family print out does not need a fresh sheet--it's just a recipe or something like that.

Some of it I tear into quarters, using the edge of a table. This photo was a little tricky to shoot with my left hand; hopefully, you get the idea. Or scissors would work, if that's how you roll. I just find it quicker to sort and tear kind of simultaneously.

These little sheets are used for grocery lists, or any other kind of little note or reminder. No more buying notepads for that!

It's frugal, it's green, it Works for Me! More tips today at Rocks in My Dryer. Go on. Check it out.